
Provision an Amazon EKS cluster with AWS CDK
Previously, I posted a tutorial on creating and configuring an Amazon VPC by using AWS CDK. All the examples in that post are based on L1 constructs to illustrate how they represent AWS CloudFormation.
In practice, however, using L2 constructs is more preferred.
They incorporate reasonable defaults and boilerplate based on best practices, alleviating the need for an in-depth understanding of all the details about AWS resources.
They also provide convenience methods to help you work with the resource.
For example, you can use bucket.grant_read(user) to grant only the minimal permissions required for user to read from the bucket:
from aws_cdk import aws_s3 as s3

bucket = s3.Bucket()
user = iam.User()
bucket.grant_read(user)
You would otherwise have to manually figure out and write the policy using L1 constructs or CloudFormation, which can be inefficient and daunting if there’s no need to fine-tune the configurations for specific exceptional cases (which I consider a scenario to avoid if possible).
This post serves as a step-by-step tutorial on provisioning an Amazon EKS cluster within a custom Amazon VPC, utilizing AWS CDK, specifically using L2 constructs.
Although the programming language for the tutorial is Python, you can use whatever familiar one among the supported programming languages.
You may incur AWS charges for the resources created by this tutorial. I advise you to consult the AWS Pricing Calculator to estimate the cost.
Prerequisites
You need to have an AWS account and have configured the AWS CLI to interact with AWS.
Here’s a list of requirements and links to install to use the AWS CDK:
- Node.js 14.15.0 or later
- Python 3.7 or later including
pip(I recommend using virtual environment such aspyenvto installation)
After satisfying all the requirements, you need to install some additional packages:
- AWS CDK Toolkit (
npm install -g aws-cdk) - AWS CDK Library (
python -m pip install aws-cdk-lib) - AWS Lambda Layer with KubeCtl v1.27 (
python -m pip install aws-cdk.lambda-layer-kubectl-v27): as we are about to create a kubernetes cluster version 1.27, we need to explicitly specifcy the kubectl version to use. Otherwise, a default layer with Kubectl 1.20 will be used. - kubectl
FYI, here are the versions of the requirements that I used to write and test the content in this post:
- Python 3.11.4
- AWS CDK Toolkit (
cdkcommand) 2.95.0 - kubectl 1.27
Although I use the AWS CLI to verify the outcomes in this tutorial, you can also use the AWS Management Console instead.
Bootstrap
You need to provision necessary resources for the AWS CDK to deploy AWS CDK apps into an AWS environment (a combination of an AWS account and Region).
This process deploys the CDK toolkit stack into an AS CloudFormation named CDKToolkit.
The simplest method to bootstrap is to use cdk command:
cdk bootstrap aws://{ACCOUNT-NUMBER}/{REGION}
For example, the following command bootstraps into ap-northeast-3 region with an AWS account number that is 123456789012:
cdk bootstrap aws://123456789012/ap-northeast-3
You can identify your account number by aws sts get-caller-identity and default region by aws configure get region.
To confirm that a new stack named CDKToolkit is created after bootstrapping, run the following command:
aws cloudformation list-stack-resources --stack-name CDKToolkit
Create the AWS CDK app
Below are the steps to create a directory named my-project for our AWS CDK app and generate the code written in Python programming language:
mkdir my-projectcd my-projectcdk init app --language python- (If you have not installed
aws-cdk-libin your environment,)python -m pip install requirements.txt
The following tree shows the files and directories created by cdk init command:
.
├── README.md
├── app.py
├── cdk.json
├── my_project
│   ├── __init__.py
│   └── my_project_stack.py
├── requirements-dev.txt
├── requirements.txt
├── source.bat
└── tests
    ├── __init__.py
    └── unit
        ├── __init__.py
        └── test_my_project_stack.py
You can take a moment to examine each file for an overview of their organization. Here’s a concise explanation of some key files and directories in the structure:
app.pycontains theAppconstruct which represents an entire CDK app. Normally, this file acts as an entrypoint forcdkcommand.my_projectdirectory is where we are going to write our stacks.my_project_stack.pyis an automatically generated file as a stack example.
testsdirectory is where where we are going to write our tests for our app.
A stack is a unit of deployment in the AWS CDK and we are about to create two stacks:
VpcStack: a stack for a VPC on which to provision an Amazon EKS clusterEksStack: a stack for an Amazon EKS
Since we are going to write our own stacks, you may just remove my_project_stack.py.
Create a VPC
Define the stack
To create a VPC, place the following code in my_project/vpc_stack.py:
# my_project/vpc_stack.py
from aws_cdk import Stack
from aws_cdk import aws_ec2 as ec2
from constructs import Construct


class VpcStack(Stack):
    """
    This stack deploys a VPC with six subnets spread across two availability zones.
    """

    def __init__(self, scope: Construct, construct_id: str, **kwargs) -> None:
        super().__init__(scope, construct_id, **kwargs)

        # https://docs.aws.amazon.com/cdk/api/v2/python/aws_cdk.aws_ec2/Vpc.html
        self.vpc = ec2.Vpc(
            self,
            id="Vpc",
            ip_addresses=ec2.IpAddresses.cidr("10.0.0.0/16"),
            max_azs=2,
            # We follow the three-tier architecture
            subnet_configuration=[
                ec2.SubnetConfiguration(
                    name="Web",
                    subnet_type=ec2.SubnetType.PUBLIC,
                    cidr_mask=24,
                ),
                ec2.SubnetConfiguration(
                    name="Application",
                    subnet_type=ec2.SubnetType.PRIVATE_WITH_EGRESS,
                    cidr_mask=24,
                ),
                ec2.SubnetConfiguration(
                    name="Database",
                    subnet_type=ec2.SubnetType.PRIVATE_ISOLATED,
                    cidr_mask=24,
                ),
            ],
        )
Here are a few notes on the configuration of VpcStack in the code above:
- The VPC meets the subnet requirements of Amazon EKS by employing at least two subnets in different Availability Zones.
- The subnet configuration follows the three-tier architecture which is the most popular implementation of a multi-tier archiecture.
- Each
ec2.SubnetConfigurationcreates a subset for each AZ, so this stack will create 6 (3 subnet groups * 2 AZs) subnets (the subnets spread across two availability zones automatically). - By default, a NAT gateway is created in every public subnet for maximum availability. So in our configuration, there will be two NAT gateways in
Web1andWeb2. - I didn’t specify the VPC name to use a generated resource name, but you can specify it with
vpc_nameparameter. It will be set toVpcStack/Vpcin our configuration. - I intentionally stored a reference to the
Vpcconstruct as an attribute ofVpcStackto pass it to the constructor of the EKS stack, which I will create later on this post.
Below is a table of subnets from the above configuration:
| Subnet Name | Type | IP Block | AZ |
|---|---|---|---|
| Web1 | PUBLIC |
10.0.0.0/24 | #1 |
| Web2 | PUBLIC |
10.0.1.0/24 | #2 |
| Application1 | PRIVATE |
10.0.2.0/24 | #1 |
| Application2 | PRIVATE |
10.0.3.0/24 | #2 |
| Database1 | ISOLATED |
10.0.4.0/24 | #1 |
| Database2 | ISOLATED |
10.0.5.0/24 | #2 |
Test the stack
Since infrastructure changes can have a significant impact on our system, testing infrastructure code is essential as any other application code we write.
To ensure our infrastructure behaves as expected, the AWS CDK library also provides assertions module.
Place the following code in tests/unit/test_vpc_stack.py:
# tests/unit/test_vpc_stack.py
import aws_cdk as core
import aws_cdk.assertions as assertions
from my_project.vpc_stack import VpcStack


def test_vpc_created():
    app = core.App()
    vpc_stack = VpcStack(app, "VpcStack")
    template = assertions.Template.from_stack(vpc_stack)

    # For arguments, refer to cdk.out/VpcStack.template.json
    template.resource_count_is("AWS::EC2::Subnet", 6)
    template.resource_count_is("AWS::EC2::NatGateway", 2)
    template.resource_count_is("AWS::EC2::InternetGateway", 1)

    template.has_resource_properties("AWS::EC2::VPC", {"CidrBlock": "10.0.0.0/16"})
    template.has_resource_properties(
        "AWS::EC2::Subnet", {"CidrBlock": assertions.Match.exact("10.0.0.0/24")}
    )
    template.has_resource_properties(
        "AWS::EC2::Subnet", {"CidrBlock": assertions.Match.exact("10.0.1.0/24")}
    )
    template.has_resource_properties(
        "AWS::EC2::Subnet", {"CidrBlock": assertions.Match.exact("10.0.2.0/24")}
    )
    template.has_resource_properties(
        "AWS::EC2::Subnet", {"CidrBlock": assertions.Match.exact("10.0.3.0/24")}
    )
    template.has_resource_properties(
        "AWS::EC2::Subnet", {"CidrBlock": assertions.Match.exact("10.0.4.0/24")}
    )
    template.has_resource_properties(
        "AWS::EC2::Subnet", {"CidrBlock": assertions.Match.exact("10.0.5.0/24")}
    )
The command to run the test:
pytest tests/unit/test_vpc_stack.py
Synthesize the stack
Although you can deploy the stack right away, it is a good practice to synthesize before deploying.
To synthesize the stack, update app.py file that as follows:
import aws_cdk as cdk
from my_project.vpc_stack import VpcStack

ACCOUNT_ID = "123456789012"  # Your AWS account ID

app = cdk.App()
vpc_stack = VpcStack(
    app,
    "VpcStack",
    env=cdk.Environment(account=ACCOUNT_ID, region="ap-northeast-3"),
)

app.synth()
As you see in the example above, we initialize app from cdk.App construct and vpc_stack from VpcStack.
And we also explicitly specify the environment for vpc_stack with cdk.Environment.
This is a recommended practice for production stacks.
The following command synthesizes an AWS CloudFormation template for the app:
cdk synth
The CloudFormation template file is created in .out directory and this is what cdk will use to deploy the VpcStack.
Deploy the stack
Now that everything’s up, issue cdk deploy to create a VPC into our AWS environment:
cdk deploy
The expected modifications will appear in the console, and you will be prompted to deploy the changes:
IAM Statement Changes
...
IAM Policy Changes
...

Do you wish to deploy these changes (y/n)?
Note that deployment may take a few seconds to a few minutes to complete.
After deploying the stack, you can verify a new VPC is created as expected with the following command:
aws ec2 describe-vpcs --filters "Name=tag:Name,Values=VpcStack/Vpc"
Again, you can also use the AWS Management Console to verify it.
Create an EKS cluster
Define the EKS stack
To create an EKS stack, place the following code in my_project/eks_stack.py:
# my_project/eks_stack.py
from aws_cdk import Stack
from aws_cdk import aws_ec2 as ec2
from aws_cdk import aws_eks as eks
from aws_cdk.lambda_layer_kubectl_v27 import KubectlV27Layer
from constructs import Construct


class EksStack(Stack):
    """
    This stack deploys an EKS cluster to a given VPC.
    """

    def __init__(self, scope: Construct, construct_id: str, vpc: ec2.Vpc, **kwargs) -> None:
        super().__init__(scope, construct_id, **kwargs)

        cluster = eks.Cluster(
            self,
            id="Cluster",
            version=eks.KubernetesVersion.V1_27,
            default_capacity=0,
            kubectl_layer=KubectlV27Layer(self, "kubectl"),
            vpc=vpc,
            cluster_name="my-cluster",
        )
Here are a few notes on the configuration of EksStack in the code above:
- Setting
default_capacity=0will prevent the initialization of any worker instances, which we plan to add later. - The Kubernetes version is 1.27.
- We employ
KubectlV27Layer(self, "kubectl")to usekubectlversion 1.27, aligning with the Kubernetes version. If not defined, a default layer containing Kubectl 1.20 and Helm 3.8 will be used.
Test the stack
Place the following code in tests/unit/test_eks_stack.py:
# tests/unit/test_eks_stack.py
import aws_cdk as core
import aws_cdk.assertions as assertions
from my_project.eks_stack import EksStack
from my_project.vpc_stack import VpcStack


def test_eks_created():
    app = core.App()

    vpc_stack = VpcStack(app, "VpcStack")
    eks_stack = EksStack(app, "EksStack", vpc=vpc_stack.vpc)
    template = assertions.Template.from_stack(eks_stack)

    template.has_resource_properties(
        "Custom::AWSCDK-EKS-Cluster", {"Config": {"name": "my-cluster", "version": "1.27"}}
    )
This test verifies that the corresponding CloudFormation template to the stack has a resource property that specifies the Kubernetes version that is 1.27.
To run the test:
pytest tests/unit/test_eks_stack.py
Synthesize the stack
Before synthesizing, update app.py to add a new stack to our app as follows:
# my_project/eks_stack.py
import aws_cdk as cdk
from my_project.eks_stack import EksStack
from my_project.vpc_stack import VpcStack

ACCOUNT_ID = "123456789012"  # Your AWS account ID

app = cdk.App()
vpc_stack = VpcStack(
    app,
    "VpcStack",
    env=cdk.Environment(account=ACCOUNT_ID, region="ap-northeast-3"),
)
eks_stack = EksStack(
    app,
    "EksStack",
    vpc=vpc_stack.vpc,
    env=cdk.Environment(account=ACCOUNT_ID, region="ap-northeast-3"),
)
eks_stack.add_dependency(target=vpc_stack, reason="We use a custom VPC for the cluster.")

app.synth()
Here’s the command to synthesize the EksStack:
cdk synth EksStack
Deploy the stack
Now that we have two stacks in our app, we can deploy only EksStack with the following command:
cdk deploy EksStack
Deploying the eks.Cluster construct may take take some time, given the numerous resources it creates in its stack.
You can verify these resources by inspecting cdk.out/EksStack.template.json, which is the CloudFormation template synthesized by running cdk synth.
After deploying the stack, you can confirm that a new EKS cluster has been created as expected by using the following command:
aws --no-cli-pager eks describe-cluster --name my-cluster
You can also list all stacks in the app:
cdk ls
Output:
VpcStack
EksStack
Update a kubeconfig file
In order to use kubectl to interact with our cluster, you need to create a masters role and associate it with the system:master RBAC group, which has super-user access to our cluster.
And by assuming this role, you can perform actions on your cluster through kubectl.
Update eks_stack.py to create a masters role and add it to system:master RBAC group:
# my_project/eks_stack.py
from aws_cdk import Stack
from aws_cdk import aws_ec2 as ec2
from aws_cdk import aws_eks as eks
from aws_cdk import aws_iam as iam
from aws_cdk.lambda_layer_kubectl_v27 import KubectlV27Layer
from constructs import Construct


class EksStack(Stack):
    """
    This stack deploys an EKS cluster to a given VPC.
    """

    def __init__(self, scope: Construct, construct_id: str, vpc: ec2.Vpc, **kwargs) -> None:
        super().__init__(scope, construct_id, **kwargs)

        cluster = eks.Cluster(
            self,
            id="Cluster",
            version=eks.KubernetesVersion.V1_27,
            default_capacity=0,
            kubectl_layer=KubectlV27Layer(self, "kubectl"),
            vpc=vpc,
            cluster_name="my-cluster",
        )

        # Create a role to interact with the cluster through `kubectl`
        masters_role = iam.Role(
            self,
            "MastersRole",
            role_name="EksMastersRole",
            assumed_by=iam.AnyPrincipal(),  # anyone can assume this role
        )
        cluster.aws_auth.add_masters_role(role=masters_role)
        # To create or update a kubeconfig file, run the following command:
        # aws eks update-kubeconfig --name my-cluster --region ap-northeast-3 --role-arn arn:aws:iam::123456789012:role/EksMastersRole
Update the EksStack by synthesizing and deploying the stack with the following commands:
cdk synth EksStack
cdk deploy EksStack
This creates an IAM role named EksMastersRole which you can assume for cluster authentication.
The next step is to update the kubeconfig file.
The command below will automatically create or update the default kubeconfig file ($HOME/.kube/config) by assuming EksMastersRole:
aws eks update-kubeconfig --name my-cluster --region ap-northeast-3 --role-arn arn:aws:iam::123456789012:role/EksMastersRole
If you encounter a permission error like AccessDeniedException in the output, make sure the profile you use with aws command has the eks:DescribeCluster permission.
The configuration in the example allows anyone to assume the masters role.
You can restrict this condition by modifing assumed_by=iam.AnyPrincipal() to assumed_by=iam.ArnPrincipal(some_arn)
Now you can use kubectl to communicate with my-cluster:
kubectl get svc
Output:
NAME         TYPE        CLUSTER-IP   EXTERNAL-IP   PORT(S)   AGE
kubernetes   ClusterIP   172.20.0.1   <none>        443/TCP   28m
Add a managed node group
While we can add and use self-managed nodes in the cluster, we are going to leverage Amazon EKS managed node groups. This option offers powerful management features including auto-scaling through EC2 Auto Scaling Groups, node version upgrade, and graceful node termination.
To add a managed node group, update eks_stack.py as follows:
# my_project/eks_stack.py
from aws_cdk import Stack
from aws_cdk import aws_ec2 as ec2
from aws_cdk import aws_eks as eks
from aws_cdk import aws_iam as iam
from aws_cdk.lambda_layer_kubectl_v27 import KubectlV27Layer
from constructs import Construct


class EksStack(Stack):
    """
    This stack deploys an EKS cluster to a given VPC.
    """

    def __init__(self, scope: Construct, construct_id: str, vpc: ec2.Vpc, **kwargs) -> None:
        super().__init__(scope, construct_id, **kwargs)

        cluster = eks.Cluster(
            self,
            id="Cluster",
            version=eks.KubernetesVersion.V1_27,
            default_capacity=0,
            kubectl_layer=KubectlV27Layer(self, "kubectl"),
            vpc=vpc,
            cluster_name="my-cluster",
        )

        # Create a role to interact with the cluster through `kubectl`
        masters_role = iam.Role(
            self,
            "MastersRole",
            role_name="EksMastersRole",
            assumed_by=iam.AnyPrincipal(),
        )
        cluster.aws_auth.add_masters_role(role=masters_role)
        # To create or update a kubeconfig file, run the following command:
        # aws eks update-kubeconfig --name my-cluster --region ap-northeast-3 --role-arn arn:aws:iam::123456789012:role/EksMastersRole

        cluster.add_nodegroup_capacity(
            id="NodeGroup1",
            min_size=2,  # Since we employ two availability zones
            desired_size=2,
            max_size=4,
            instance_types=[
                ec2.InstanceType.of(
                    instance_class=ec2.InstanceClass.T3,
                    instance_size=ec2.InstanceSize.MEDIUM,
                )
            ],
            disk_size=20,  # default
        )
While the code above deploys two worker instances of the t3.medium type, you have the flexibility to configure your node group according to your preferences.
By default, private subnets are employed for the node group, primarily for security reasons.
This setting is one of the sane defaults that Cluster construct offers.
Now update EksStack by synthesizing and deploying the stack with the commands below:
cdk synth EksStack
cdk deploy EksStack
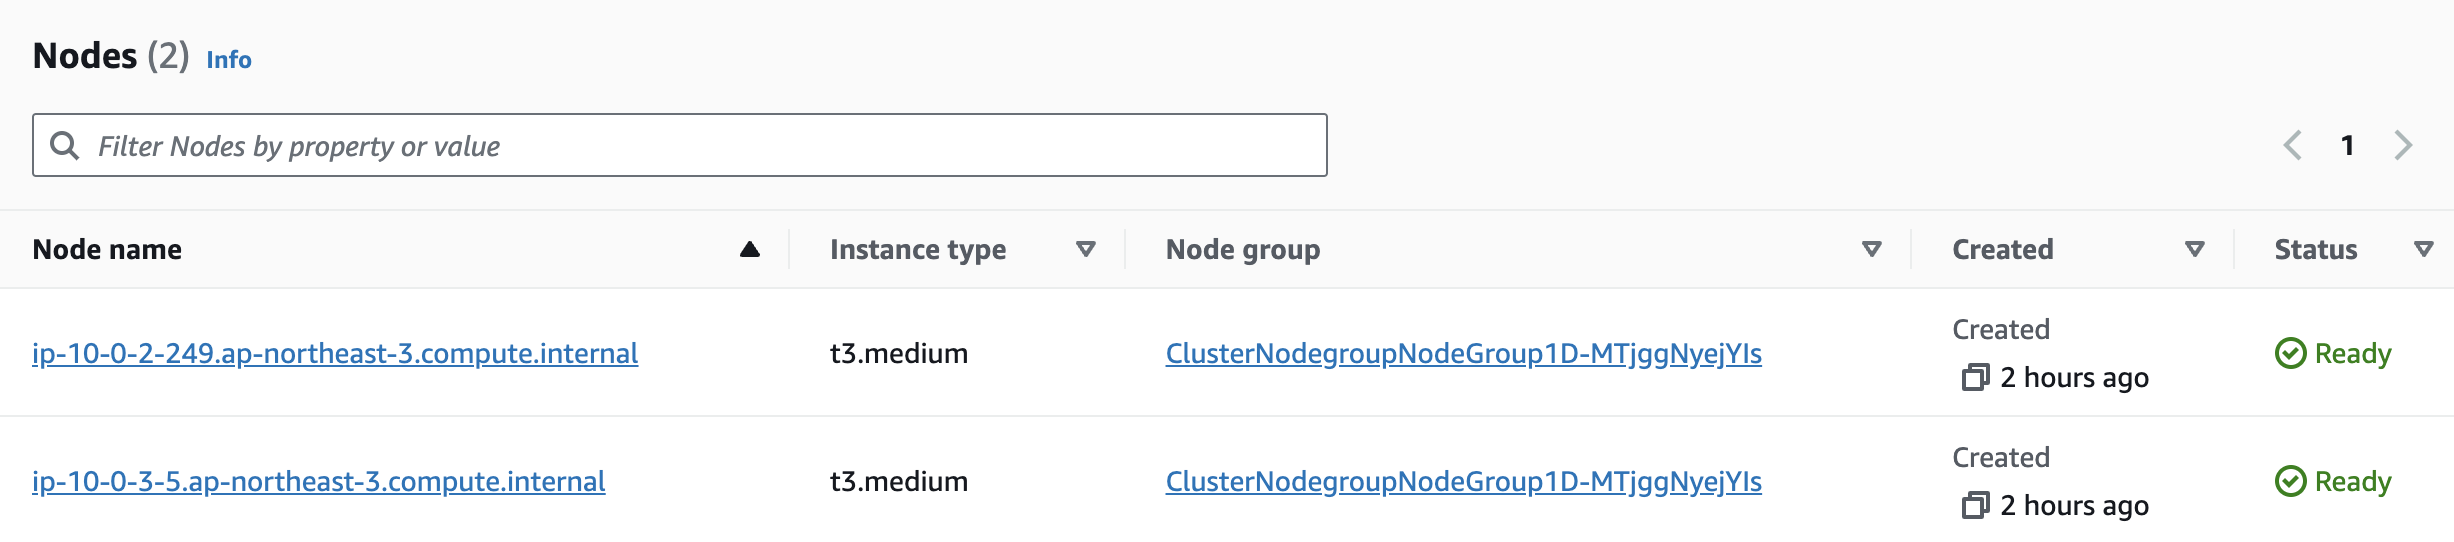
After updating, you can simply confirm the new nodes in the cluster with kubectl:
kubectl get node
Output:
NAME                                            STATUS   ROLES    AGE    VERSION
ip-10-0-2-249.ap-northeast-3.compute.internal   Ready    <none>   118s   v1.27.7-eks-4f4795d
ip-10-0-3-5.ap-northeast-3.compute.internal     Ready    <none>   2m5s   v1.27.7-eks-4f4795d
You can also verify that the two nodes are evenly distributed across two private subnets.
View Kubernetes resources in the console
Basically, you can’t view the Resources tab and Nodes section on the Compute tab in the AWS Management Console with the following console error message:
Your current IAM principal doesn't have access to Kubernetes objects on this cluster.
This may be due to the current user or role not having Kubernetes RBAC permissions to describe cluster resources or not having an entry in the cluster’s auth config map.
There are two options to make Kubernetes resources visible in the AWS Management Console for you or other users:
- Grant permissions to IAM users: This involves creating an entry for each individual IAM user in the
aws-authConfigMap. However, it can become cumbersome as the number of users requiring access grows. - Grant permissions to IAM roles: This option allows users to use an IAM role, providing easier maintenance and when multiple users need access.
I will describe both options in this post. You can choose whichever that meets your organization’s requirements.
Whatever you choose, it is recommended that you periodically audit the aws-auth ConfigMap to see who has been granted access.
Option a: Grant permissions to IAM users
Firstly, make sure the IAM user you want to allow to view the console has the following permissions:
{
    "Version": "2012-10-17",
    "Statement": [
        {
            "Effect": "Allow",
            "Action": [
                "eks:ListFargateProfiles",
                "eks:DescribeNodegroup",
                "eks:ListNodegroups",
                "eks:ListUpdates",
                "eks:AccessKubernetesApi",
                "eks:ListAddons",
                "eks:DescribeCluster",
                "eks:DescribeAddonVersions",
                "eks:ListClusters",
                "eks:ListIdentityProviderConfigs",
                "iam:ListRoles"
            ],
            "Resource": "*"
        },
        {
            "Effect": "Allow",
            "Action": "ssm:GetParameter",
            "Resource": "arn:aws:ssm:*:123456789012:parameter/*"
        }
    ]
}
The next step is to create a Kubernetes ClusterRole and ClusterRoleBinding that has the necessary permissions to view the Kubernetes resources:
kubectl apply -f https://s3.us-west-2.amazonaws.com/amazon-eks/docs/eks-console-full-access.yaml
The last step is to add the following mappings to the aws-auth ConfigMap:
- The
EksMastersRolerole and theeks-console-dashboard-full-access-group. - The IAM user and the
eks-console-dashboard-restricted-access-group.
To do this, open the editor to edit configmap/aws-auth:
kubectl edit -n kube-system configmap/aws-auth
And then, add the following mappings to the existing ones:
apiVersion: v1
data:
mapRoles: |
  - groups:
    - eks-console-dashboard-full-access-group
    rolearn: arn:aws:iam::123456789012:role/EksMastersRole
    username: EksMastersRole
mapUsers: |
  - groups:
    - eks-console-dashboard-restricted-access-group
    userarn: arn:aws:iam::123456789012:user/mickey
    username: mickey
Now you can view the Kubernetes resources in the console.
You can also achieve the editing part by updating the EksStack as follows:
# my_project/eks_stack.py
from aws_cdk import Stack
from aws_cdk import aws_ec2 as ec2
from aws_cdk import aws_eks as eks
from aws_cdk import aws_iam as iam
from aws_cdk.lambda_layer_kubectl_v27 import KubectlV27Layer
from constructs import Construct


class EksStack(Stack):
    """
    This stack deploys an EKS cluster to a given VPC.
    """

    def __init__(self, scope: Construct, construct_id: str, vpc: ec2.Vpc, **kwargs) -> None:
        super().__init__(scope, construct_id, **kwargs)

        cluster = eks.Cluster(
            self,
            id="Cluster",
            version=eks.KubernetesVersion.V1_27,
            default_capacity=0,
            kubectl_layer=KubectlV27Layer(self, "kubectl"),
            vpc=vpc,
            cluster_name="my-cluster",
        )

        # Create a role to interact with the cluster through `kubectl`
        masters_role = iam.Role(
            self,
            "MastersRole",
            role_name="EksMastersRole",
            assumed_by=iam.AnyPrincipal(),
        )
        cluster.aws_auth.add_masters_role(role=masters_role)
        # To create or update a kubeconfig file, run the following command:
        # aws eks update-kubeconfig --name my-cluster --region ap-northeast-3 --role-arn arn:aws:iam::123456789012:role/EksMastersRole

        cluster.add_nodegroup_capacity(
            id="NodeGroup1",
            min_size=2,  # Since we employ two availability zones
            desired_size=2,
            max_size=4,
            instance_types=[
                ec2.InstanceType.of(
                    instance_class=ec2.InstanceClass.T3,
                    instance_size=ec2.InstanceSize.MEDIUM,
                )
            ],
            disk_size=20,  # default
        )

        # Before updating, you should you should create a Kubernetes
        # `ClusterRole` and `ClusterRoleBinding` that has the necessary
        # permissions to view the Kubernetes resources with the command:
        # kubectl apply -f https://s3.us-west-2.amazonaws.com/amazon-eks/docs/eks-console-full-access.yaml
        cluster.aws_auth.add_role_mapping(
            role=masters_role,
            groups=["eks-console-dashboard-full-access-group"],
        )
        mickey = iam.User.from_user_arn(
            self, "mickey", user_arn=f"arn:aws:iam::{self.account}:user/mickey"
        )
        cluster.aws_auth.add_user_mapping(
            user=mickey,
            groups=["eks-console-dashboard-full-access-group"],
        )
Option b. Grant permissions to IAM roles
To use the masters role to view the console, you can grant permissions to it by updating eks_stack.py as follows:
# my_project/eks_stack.py
from aws_cdk import Stack
from aws_cdk import aws_ec2 as ec2
from aws_cdk import aws_eks as eks
from aws_cdk import aws_iam as iam
from aws_cdk.lambda_layer_kubectl_v27 import KubectlV27Layer
from constructs import Construct


class EksStack(Stack):
    """
    This stack deploys an EKS cluster to a given VPC.
    """

    def __init__(self, scope: Construct, construct_id: str, vpc: ec2.Vpc, **kwargs) -> None:
        super().__init__(scope, construct_id, **kwargs)

        cluster = eks.Cluster(
            self,
            id="Cluster",
            version=eks.KubernetesVersion.V1_27,
            default_capacity=0,
            kubectl_layer=KubectlV27Layer(self, "kubectl"),
            vpc=vpc,
            cluster_name="my-cluster",
        )

        # Create a role to interact with the cluster through `kubectl`
        masters_role = iam.Role(
            self,
            "MastersRole",
            role_name="EksMastersRole",
            assumed_by=iam.AnyPrincipal(),
        )
        cluster.aws_auth.add_masters_role(role=masters_role)
        # To create or update a kubeconfig file, run the following command:
        # aws eks update-kubeconfig --name my-cluster --region ap-northeast-3 --role-arn arn:aws:iam::123456789012:role/EksMastersRole

        cluster.add_nodegroup_capacity(
            id="NodeGroup1",
            min_size=2,  # Since we employ two availability zones
            desired_size=2,
            max_size=4,
            instance_types=[
                ec2.InstanceType.of(
                    instance_class=ec2.InstanceClass.T3,
                    instance_size=ec2.InstanceSize.MEDIUM,
                )
            ],
            disk_size=20,  # default
        )

        masters_role.add_to_policy(
            iam.PolicyStatement(
                actions=["eks:AccessKubernetesApi", "eks:Describe*", "eks:List*"],
                resources=["*"],
            )
        )
Synthesize and deploy the EksStack with the commands below:
cdk synth EksStack
cdk deploy EksStack
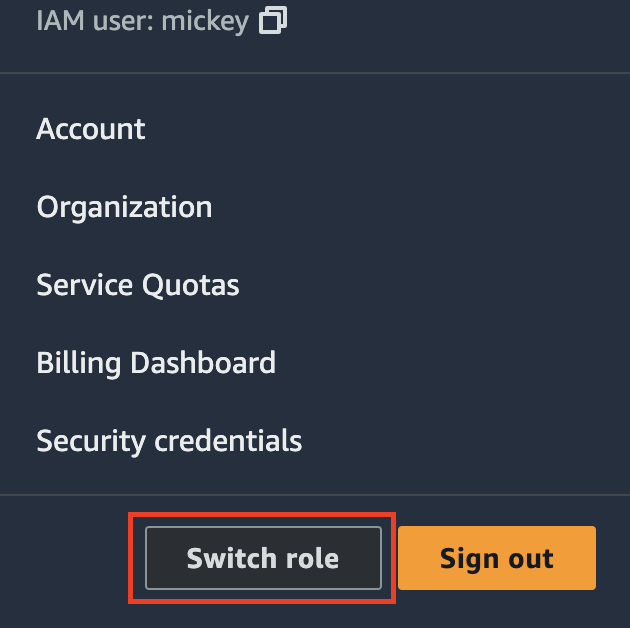
To switch to MastersRole, navigate to your user name on the navigation bar in the upper right of the console, and choose Switch Role:
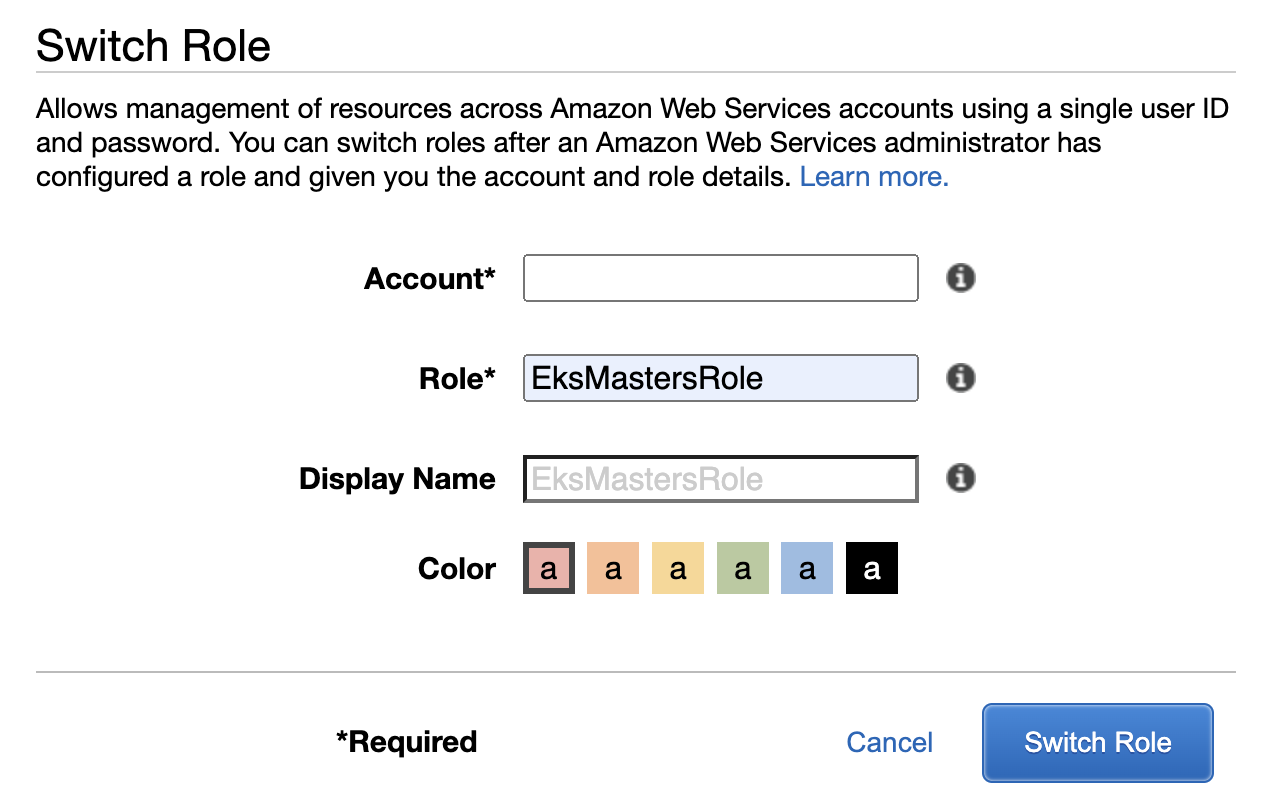
Enter Account, Role, and Display Name (optional) and choose Switch Role:
Now you are able to see Nodes section on the Compute tab in the console:
If MastersRole is configured to be assumed by any principal, any IAM user can switch to the role.
You can limit this permission by changing assumed_by=iam.AnyPrincipal() to assumed_by=iam.ArnPrincipal(some_arn)
Destroy
If you want to destroy EksStack for example, issue the following command:
cdk destroy EksStack
Or destroy all stacks in the app:
cdk destroy --all
Conclusion
As a former CloudFormation user, provisioning a new VPC and EKS cluster on AWS used to demand careful consideration and a deep understanding of resource details. However, in practice, there are established best practices and defaults. Writing code to follow these best practices would be a waste of time if any of them could be automated. This is where AWS CDK can do much more with much less code compared to CloudFormation.
For a console user, opting for IaC tools like AWS CDK over the web console surely involes certain trade-offs. Nevertheless, the ease of use and flexibility offered by AWS CDK can undoubtedly streamline the process, making it a compelling choice for provisioning an EKS cluster. Additionally, it’s remarkably easy to clean up the resources left after deleting the cluster.